Monday 28 November 2011

Assignment - Extra Model - X- Wing

So just a quick post about the progress of my assignment. As Ive only made the Tie Fighters for my animation sequence, I am still required to make the x-wing for my sequence. As ive only used similar techniques that ive picked up in creating my previous models, im not going to post up the creation of every component of the x-wing. So here is the body and a few steps to creating it;

This is the starting of the body, I made it from a cylinder and converted to a editable poly and moved the vertices.

This is the Back end of the body completed;

This is the side view of the body completed;

Next I created the wings for the X-Wing, Here they are;

Now I have the body and the wings, I can now make the exhausts. Here are the completed exhausts;


Now I just needed to do the turrets on the wings.

I decided that i would make the part of R2D2 that would show up in the body of the x-wing just to give it a bit of character.


After adding some metal textures to the model my X-Wing is completed and here is the final product;

Friday 25 November 2011

Working with Cameras


I started to work with cameras in 3D Studio Max this week and have worked through a tutorial in making a camera follow a path. This can be useful if I want a camera to keep target on something and also move around or past the object. First of all I needed to create a Line that would be the path that the camera will follow. Using the line tool I created a Path;


After I had my path, I needed to create an object that the target camera will focus on. I'll just use a standard cube primitive for this;

Now I have my path and I have my object, I just need to create my camera. Under the create tab, then under the cameras tab, I can create a Target camera. Click and drag from where I want my camera to be placed, which is going to be somewhere on the spline and then release the drag on the target that I want the camera to focus on;

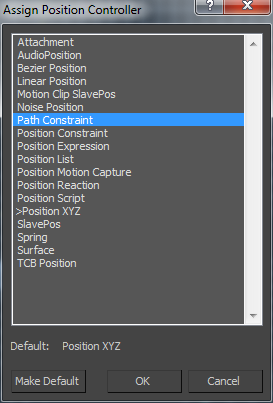
Now the camera is created, we need to attatch it to the path so that it knows that it is going to follow it. If I select the camera and then go to the motion tab and give it an Assign Controller called Path Constraint. This will attatch the camera to the path and allow it to only move along the path;


The camera will snap to the start of the path and it has also added two keyframes into the timeline. Now when we play the animation it will move across the path and continue to face the object.

I also tryed this technique with a free camera. This will remain facing in the direction that I choose and follow the path. For this, I followed the same techniqu as I did for the targe camera, however I used a Free Camera and also I changed the shape of the path. Here is the layout of the scene now;

Now if i change the perspective view port to view what the camera002 sees, It will follow the path to see the 4 objects;


Saturday 12 November 2011

Working with Lighting

This week we looked at lighting and how it can be used in our animations. Using a preset .max file, I followed through the exercise which would show how all the different lights work. First of all I select the lights tab in the create tab of the control panel. This bring up the option of all the lights. Lights avaliable to use are Omni Lights, Spot Lights, Direct Lights and a few others as shown in the image below;


Omni lights are like a miniture sun, they omit light in all directions from the point they are created. Spot lights use light in an outward cone shape from a single point and direction lights are similar to spot lights however they project light in a culinder or rectangular shape in the direction they are set. The other lights are more advanced lighting and so I wont be using these as much in my final animation. I will have a look at what they do and how they work and if its what is needed then I shall consider using them.

So back to the task, firstly i need to create an Omni light in my scene. To do this I select omni light from the lights tab and then I place it in the top right of the front view perspective so that it is above the dolphin but in line with its side.


Here is the effect that the Omni light has on the dolphin, Notice that the side where the omni light is placed has highlights and the other side is shadowed;


 Now ill take a look at the direct light, im goign to use the target direct on the dolphine and see how it effects the object. Here is how it effects the dolphin;


As you can see the area covered by the wireframe of the light has been covered in light but the area outside of the wirefram is dark without light.